Obviously not writing! A few months ago as my hubby and I were visiting the Chattanooga WorkSpace for Open Studio Night, it struck me that I really wanted to have a studio there. I had already been teaching my fermentation classes there for a few months, so I applied and got in! I’m actually sharing a studio with another gal. She’s rarely there (she’s a photographer), so I have the space to myself to do my textile art.
Natural Dyeing and Plant Pounding Items I’ve Made
Years ago I had done a good bit of fabric dyeing and have gotten back into it with a vengeance. One of the things I want to try soon is dyeing with prickly pear. The Navajo have used prickly pear for centuries to dye their fabric. Now you may wonder why I’m going on about this on my fermentation blog, but prickly pear dye is fermented! I’ve never eaten prickly pear, but I’ll certainly be looking for them in the grocery store now. When I do this experiment I’ll certainly take photos and post them.
I also completed the Hamilton County Master Gardener course. I’ve been doing organic gardening for four years now, but I learned so much! I’ve completed over half of my volunteer hours required to become a certified Master Gardener. Still over 20 to go!
Despite everything else going on, I’ve continued to teach my fermentation classes and have even added a couple to my repertoire. In March I taught a class called “Kombucha & More.” The “More” was jun and water kefir. It went really well and I’m looking forward to doing that one again in the fall. In June I will be teaching a blackberry wine class. I’ll actually be teaching it in July, as well. My old friend, Kim Hines from Augusta Locally Grown, reached out to me and asked me to come back to Augusta and teach. Then I’ll be racing back the Chattanooga to teach a Bratwurst & Sauerkraut class at the Sweet & Savory Classroom. It will be my first time partnering with this organization, so keep your fingers crossed for me! Then I’ll be teaching a class on Hard Root Beer and Hard Ginger Beer. Then in August I thing I’ll do Veggie Fermentation once again so folks will be ready for their harvest.
So see, I’ve been busy! I’ve neglected my blogging too long, though. I’ll be getting back in the swing of blogging again, so keep your eyes peeled for new posts. Also, if you are into textiles check out my other website. I’ll be teaching various textile classes in the weeks to come.
Earlier this summer I could step outside in my yard back in SC and spend nearly an hour a day foraging for wild blackberries. It seemed that no matter how thoroughly I thought I’d looked at a patch of ground, as soon as I took a couple of steps away and looked back I’d see more ripe berries that I hadn’t seen before. Since these were berry vines that were just growing all over the ground, I had to be totally in the moment as I carefully picked (no pun intended) my way across the various berry patches in order not to step on the berries.
A Change in Perspective Reveals Hidden Treasure
Now that I’ve moved to Chattanooga, TN, I’ve gone berry picking at Crabtree Farms for blackberries and blueberries a few times. Their blackberry vines are huge, cultivated giants compared to the wild berries back in SC. Since they opened the picking up to the public, I often would be surrounded by other folks. I think it is interesting that I could come along behind many other people and still be able to find perfectly good berries to pick. Of course, many of those were outside the normal line of sight. I often reached through to the other side of the fence that supports the vines to find beautiful berries untouched. Likewise, by changing my perspective and looking up from below where the vines are thickest I was able to find handfuls of gorgeous berries.
I can’t help but think that we should often change our perspective in order to find the amazing things others have overlooked. And I hope to bring the mindfulness I found in picking berries to other parts of my life.
Last year a friend told me about Earth Boxes. She said she had a few of them on her back porch and that she ended up with so many tomatoes she couldn’t preserve them all! Since I have left my large raised beds in Aiken, I knew I had to give them a try.
Raised Garden Beds I left behind in AikenEarth Boxes planted with tomatoes and a pepper plant.
We had to re-home our chickens when we moved to Chattanooga. Chatt is super cool, but it’s behind the times when it comes to having backyard chickens. Plus, until we sell our SC home we are renting an apartment.
The chickens had always eaten well at our house, since they got almost all of our kitchen scraps. They loved anything that still had seeds, so I guess I shouldn’t have been surprised when tomatoes, peppers, and squash started growing in the yard where the chickipoos had been last year. When we were packing up to move, I dug up a couple of tomatoes and a pepper plant to bring with us.
In the photo above you can see the three plants on the right are pretty big – those were the ones the chickens planted in the ground. The three tiny seedlings on the left are the ones I started a couple of months ago. Those poor little things suffered from the instability of our lives the past month trying to get moved. I think the only reason they are probably still alive is that I grew them in pure worm castings. Now that they have been transplanted into the Earth Boxes I’m hoping they’ll really start to grow well. I’d love to have a bumper crop of tomatoes! While transplanting my ‘maters & peppers yesterday, I found that one plant had started growing fruit. I hope this is just the start of a great growing season!
Three years ago my husband and I bought a lovely three-bedroom home on a little more than half an acre of land. If you’ve read my previous posts you know that we have put a lot of work into our land to bring fertility and beauty to an acidic, parched, sandy lot that had been neglected and abused for decades.
Our lovely house today.
We busted our butts clearing scrub brush and overgrown azaleas, and breaking up the compacted soil by tilling almost the entire yard. I planted fruit trees and blueberry bushes, strawberries and asparagus – plants that will produce every year with a little care. I built raised beds and created soil out of yard and kitchen waste, composted manure, and peat moss. I tossed about 100 earthworms in the beds to eat the organic matter in them and turn it into microbe-rich worm dirt, then started heirloom seeds to grow delicious, nutrient-rich food.
Baby ChickipoosChicken Tractor
We went further in our dream of a sustainable life by getting baby chicks and raising them up. We built them a chicken tractor and moved them to a new patch of grass every day or so. We were happily surprised about how much better the yard looked a couple of weeks after the chickipoos had scratched and aerated the soil, eaten all the plants & bugs, and left a bit of fertilizer behind them. And at the end of the day, we had fresh, delicious eggs! We also built a worm bin. Whatever kitchen waste the chickens wouldn’t eat (coffee grounds, tea leaves, etc) went to the worms. That worked well for a while, but our worms decided to migrate and left the bin one day. It was kinda weird, but other folks I’ve talked to say that worms do that sometimes.
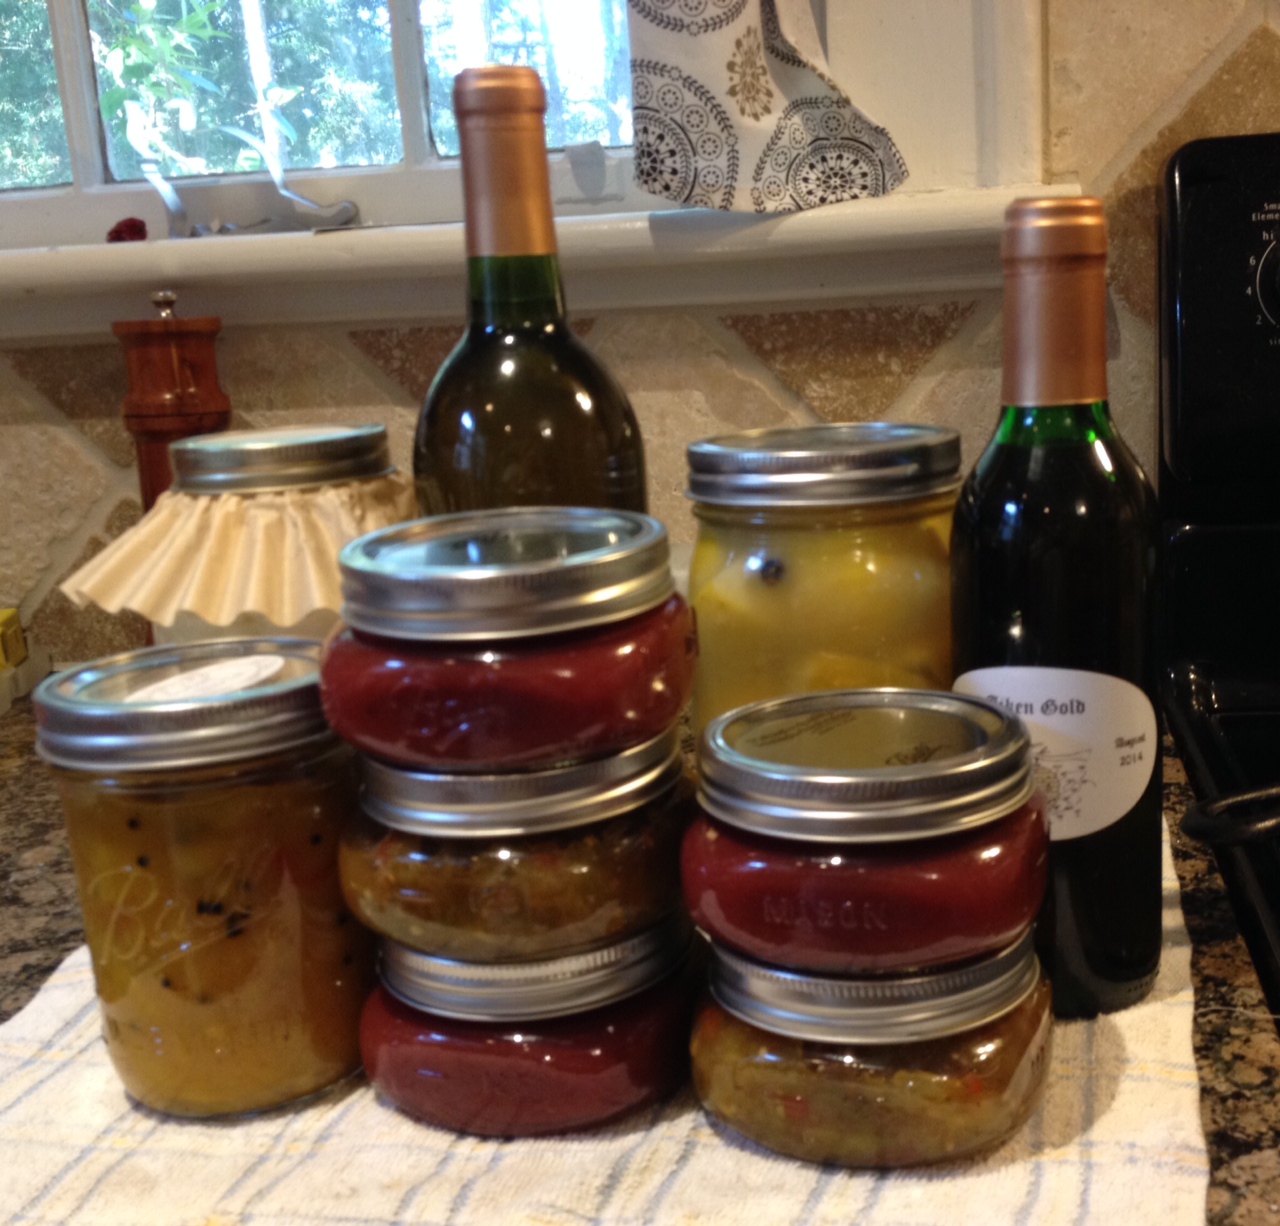
Along the way I discovered fermentation and took to it like a duck to water. I’ve made all kinds of fermented veggies, brined eggs, soft and hard cheeses, bacon, prosciutto, kombucha, kefir, yoghurt, skyr, clabbered milk, mead, hard cider, beer, and wine.
Lots of fermentation going on!
When we bought our home we thought we’d be there for a very long time, but life happens. Neither of us were successful in finding employment that we were in the least bit happy doing. I spent many months trying to get our business off the ground, but after failing to get financing we came to the conclusion that we were simply in the wrong place. We had chosen our town because of the lovely little downtown area, but you know what they say about books and covers. There was really very little going on in the CSRA that we could do for recreation other than tending our animals and our plot of land. Those things were great, but we had left an amazingly rich life back in the Ozarks before moving to South Carolina.
Last summer my dear friend, Hope, and I had taken a trip to see Rock City. Both of us are fans of Neil Gaiman’s American Gods and had always talked about going together to see where the battle scene in the book took place. I fell in love with Chattanooga! It reminded me of my old hometown of Fayetteville, AR, but it’s even funkier. I knew my hubby would like it because of the mountains and the wonderful local food culture. So when the opportunity presented itself, I encouraged him to apply for a job there and since he’s super awesome, he got it!
Now we’re living between two places: our house in Aiken and our rented apartment in Chattanooga. We realized a few months ago that we have a big house that costs a small fortune to heat and cool, but we only live in three rooms. The whole time we’ve lived there we’ve had one guest that took advantage of our guestroom… one! We have decided that if we want to seriously commit to a sustainable lifestyle and stop spending all our time dealing with household maintenance, we have to make a big change. In a few weeks we’ll have an estate sale where we will be selling off at least 70% of our belongings. It hurts a bit, but it’s just stuff. Then we are going to sell our house. I’m really hoping that someone comes along that wants to garden and falls in love with our property. The hard work has been done already, they just need to plant and tend the garden. Once the house is sold, we are buying at least five acres of property outside of town and we’re going to build a tiny house!
By selling most of our stuff we’re hoping to whittle things down to a much more manageable state. We won’t have room for a dishwasher, so we decided to cut down the number of dishes we have. Instead of a set of eight dishes, we currently have a set of four. We are thinking about cutting that down to a set of two. That way, I will wash each of my dishes when I’m done with it and not have a big pile of dishes to wash everyday. And if we do have company, they will be told ahead of time about our kitchen arraignment and to bring their own dishes. With less of our time being spent on things that aren’t really important, we can devote ourselves to the things we really love to do: hiking, dancing, brewing, gardening, raising critters, reading, and hanging out with friends. And hopefully, we will start our business in Chattanooga. The culture here is much better for what we want to do.
I’m sad to think about what we are leaving behind. But I’m even more excited about what lies ahead!
In our household I do all the food fermentation (veggies and dairy, occasionally curing bacon too). I also make mead, wine, cider, and ciser. My hubby primarily makes beer. I’ve brewed beer a couple of times so that I could understand the process, but beer brewing is one of my beloved’s favorite hobbies (and he’s very good at it), so I tend to leave that mostly to him. When he first started out, he brewed kits in our kitchen.
My hubby and his brew kitty, Mooshi, brewing beer in the kitchen
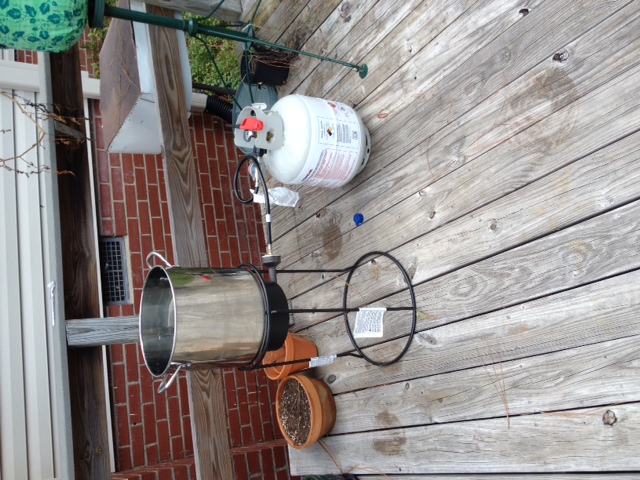
The kits were easy (most, if not all, the malt is in liquid or dry extract form), but I encouraged him to brew all grain beer. In my mind, it is just another type of cooking. After reading many of articles and forums and watching lots of YouTube videos, my hubby built a mash tun, bought a propane fish fryer, a small oxygen tank, and a ten gallon brewing kettle.
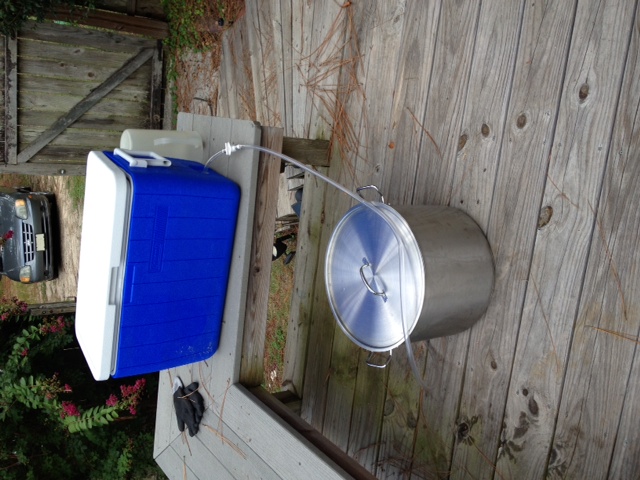
Brew Kettle on Fish FryerMash Tun and Brew Kettle
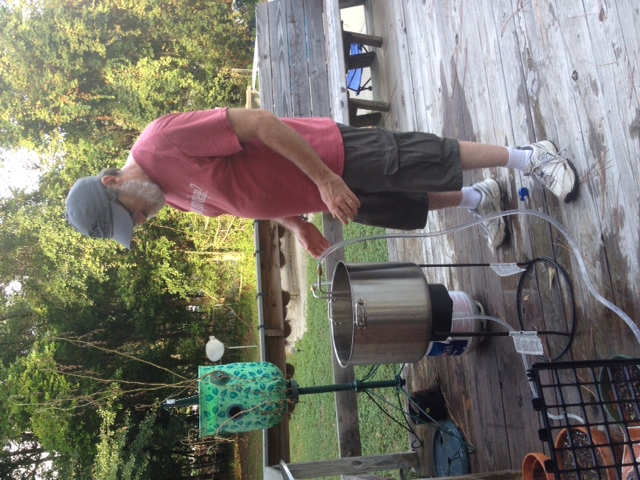
To brew beer all you must do is put your malted grain into the mash tun, bring about 5-7+ gallons of water to just before boiling and gently pour it into the mash tun with the grain (this is called mashing in). If you look at the mash tun (the modified cooler), you can see a tube with a valve coming out of it. Make sure the valve is closed before pouring the water in, or else it won’t be doing its job properly. After maybe an hour, open the valve and drain the liquid, called wort at this point) into the mash tun. While the grain has been mashing you would have boiled up a bunch more water which you very gently and slowly pour over the grains, this is called sparging. After you’ve collected all the sparged water in the mash tun, you boil the whole thing for about an hour. At certain points in the boil you add hops and/or other herbs and spices to bitter and add various other flavors. After all this you have to cool the wort down so that when you add yeast the heat doesn’t kill them. After various low-tech methods, my hubby bought a wort chiller (a big coil of metal tubing that cold water runs through while it sits in the wort) to cool the wort off quickly.
My hubby using the wort chiller to cool the wort.
After all that he pours the cooled wort into a sanitized carboy, puts a sanitized tube attached to the oxygen tank into the wort and lets the oxygen flow into the wort for one minute. Adding oxygen is very important because the yeast needs it to multiply and thrive during fermentation. After that he adds his yeast, puts an airlock on it and lets the yeast do the job of multiplying and turning all the sugars extracted from the grain into alcohol. It isn’t until the wort has fermented that it is actually beer.
Now having made mead, wine, and so forth, I knew a good deal about those darling little microbes called yeast. When I first heard Sandor Katz and Michael Pollan talk about the microbes in fermented foods I started reading a good deal about what happens during lacto-fermentation among other kinds of fermenation. I knew that the thing that makes your salted cabbage turn into sauerkraut is that all plant matter is covered in lactic acid bacteria (LAB), also known as lactobacillus. What I didn’t understand is how the vegetables got the microbes to begin with.
A couple of weeks ago I went to a Master Gardening lecture by Dr. Al Bey called Teaming with Nature – Organic Yards and Gardens. Dr. Bey is a retired chemist. When he first moved to South Carolina from Michigan he used chemical fertilizers, herbicides and pesticides on his lawn and garden. He’d been a chemist his entire career, so he really didn’t know any better then. But soon enough he realized that the problems he was treating with chemicals were only getting more pervasive and he decided to try something different – organic lawn and garden care.
I’m really glad Dr. Bey does have a background in science, because the handout we all received is 30 pages long! He has done all kinds of research to understand what needs to happen beneath the surface of the soil to produce beautiful, nutritious food and a lush yard. I certainly can’t go through it all here (this post is plenty long enough), but what I took away was the importance that microbes play in the nutritional value of the soil. If you have nutritious soil, you have nutritionally dense food, which in turn makes you healthier when you eat it. One of the richest sources of microbes that you can add to your soil is worm castings.
I remember reading an article a few years ago (I want to say it was in Mother Earth News, but I can’t swear to that) where a couple in the wastes of Australia turned their horribly infertile land into a lush pasture by making worm casting tea and dripping in onto their soil. After hearing Dr. Bey talk about using worm casting and compost tea to enrich your soil it all started coming together in my mind!
1. Make worm casting tea to feed my soil.
2. Continue to feed the microbes throughout the year via dehydrated, non-sulfured molasses.
3. Eat the nutritious food as it ripens. If there’s more than we can eat, ferment it to eat later.
It is so simple, but so intricately complex all at once! Feed the soil microbes and they in turn will feed you AND the microbes in your gut that are so tremendously important for your health.
Now you may wonder what all the talk about beer was to begin with. Well let me show you what I did to start making my worm casting tea. This recipe was from Dr. Alvin E. Bey’s article Teaming with Nature (Article No. 8) – Energizing your Soil with Compost Tea.
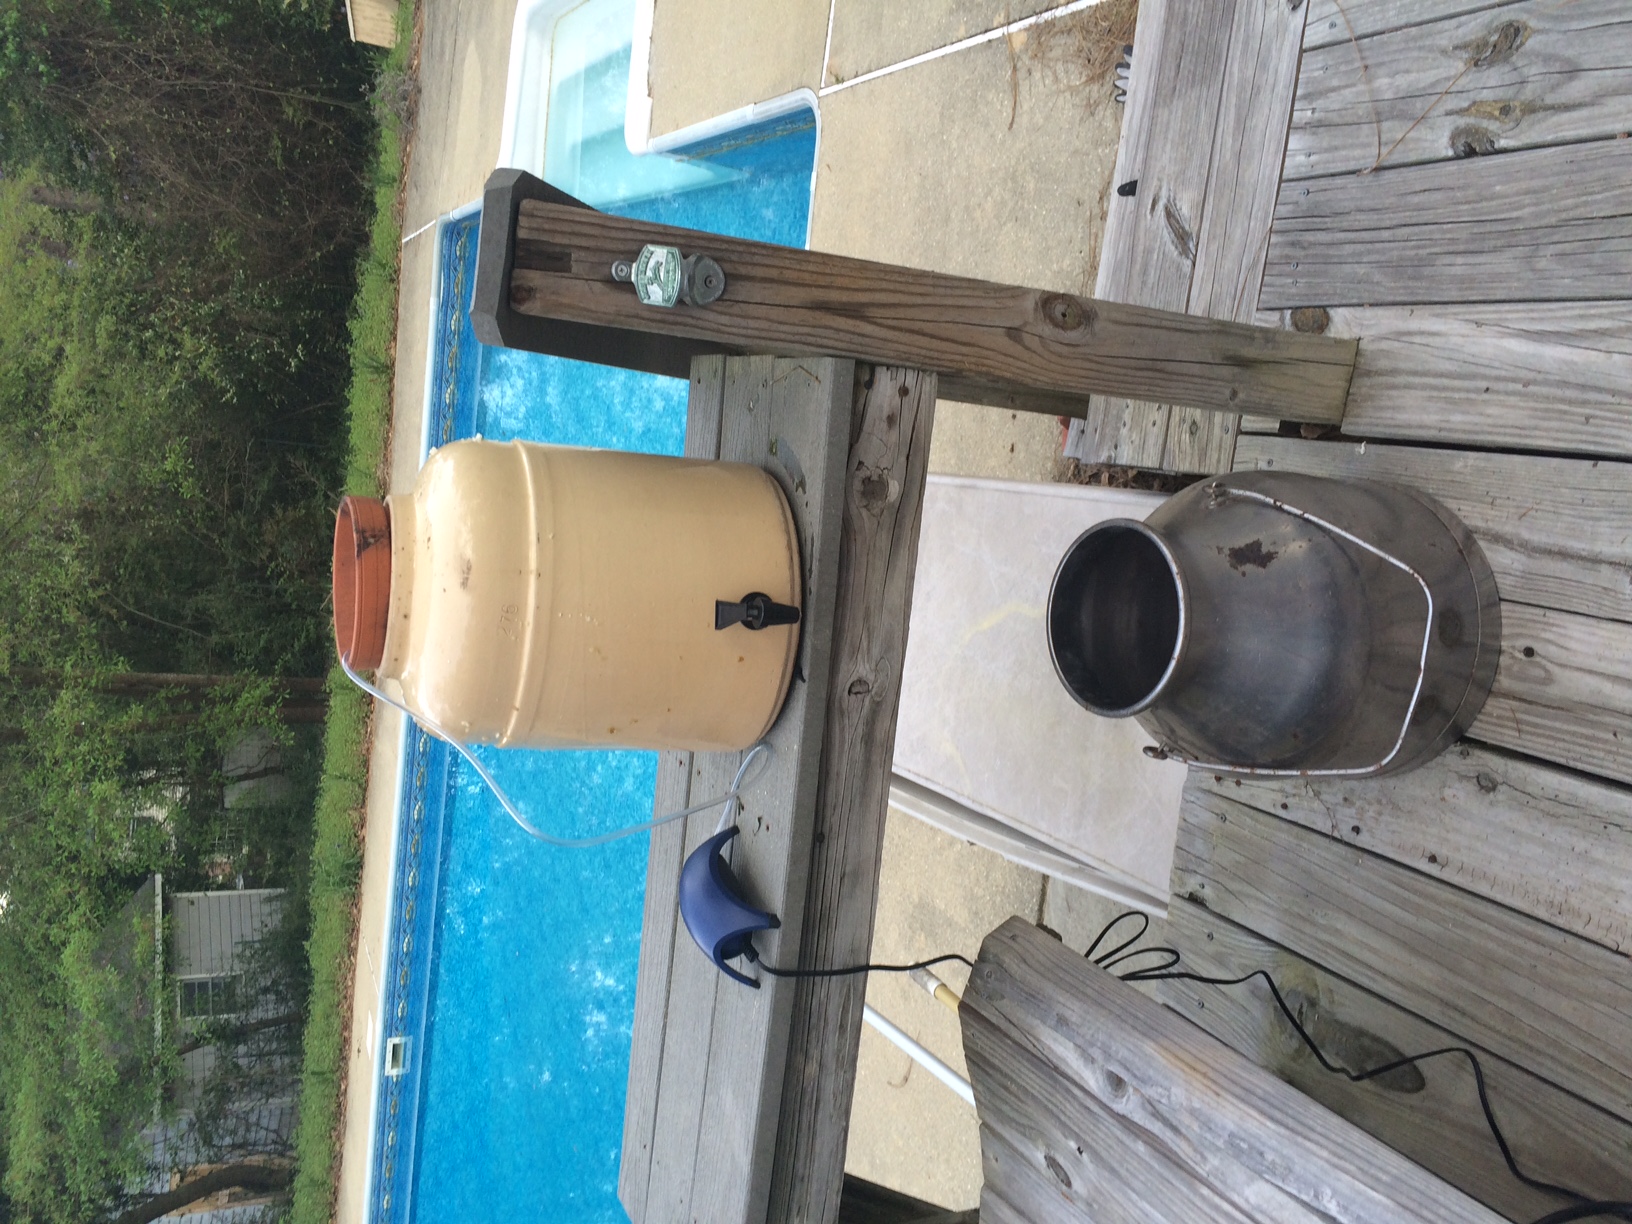
1.Fill a cloth bag with four cups worm castings, compost, or a combination of the two. Add four gallons of water (I used rainwater I collected in a rain barrel) and two ounces of non-sulfured molasses as a food source for the microbes (I used locally produced cane syrup). Put it in a bucket or whatever you have to use. I used an old water cooler that I was using as a continuous kombucha brewer, but it has since cracked and the buch started seeping through. It works great for this though!
Bag of worm castings going into the rain water.
2. Aerate with an aquarium pump or fountain pump for 24 hours.
Worm Casting Tea Brewing Away
After the microbes have had food (cane syrup/molasses) and air, they multiply tremendously and can then be sprayed on your soil. You can see in the picture above, I drained my tea into an old milk pail that my grandparents used when they had dairy cows back in the 50’s and 60’s. After that I pour it into my watering can or a pump sprayer and sprinkle the tea over the soil. It doesn’t take too much in any one place. The idea is to get them into the soil so they can help the plant roots access minerals in a more effective way. I followed the sprinkling with a little bit of spraying with my water hose. I’m sure it was probably unnecessary, but I didn’t want the little critters getting lost.
So in both the beer and with the worm casting/compost tea, the various microbes need air and sugar to reproduce and do their jobs.
Now I am the kind of person that wants to really understand how things work. I’ve decided to audit some classes in the near future on biology and microbiology. I took biology in college, but the poor old instructor was literally senile. We barely learned anything in that class, so I want to go back and learn it properly. I want to see the various microbes under a microscope and see what it is that they do!
While I’ve been ruminating over this whole concept the past few weeks, I started listening to a new podcast (new for me, that is), The People’s Pharmacy. I happened to listen to Episode 959: Farmacology – What Farmers Can Teach Us About Health, which is the title of a book by Daphne Miller, MD. Dr. Miller has done some of the research that I have been so curious about. I sat down this evening and began reading. I got ao excited reading about the connection between nurturing the soil and nurturing our bodies, I had to get out of bed to write about what has been bouncing around my brain!
I know there will be more to follow on this topic, but it’s now 4:01 am and I haven’t gone to sleep yet. Besides, you’ve got to be tired of reading my ramblings by now. 🙂
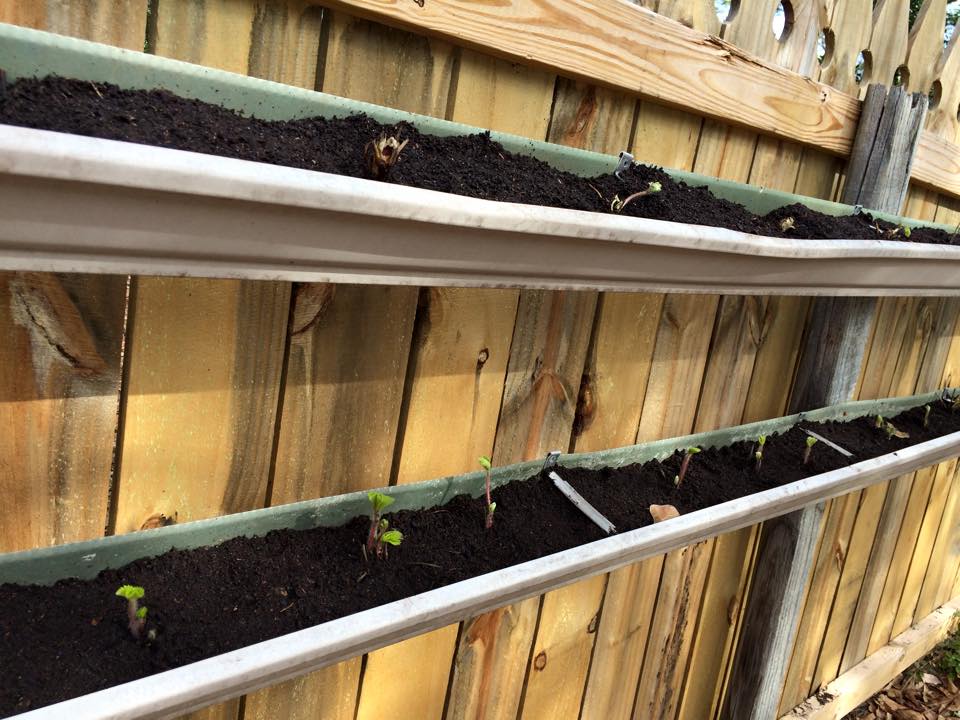
Last year when the big ice storm hit our town a huge tree limb fell on our roof leaving a lot of damage. One of the things that was damaged was the 50′ long gutter on the front of the house. It took MONTHS to get it replaced (if you want to see steam come from my ears, get me talking about dealing with contractors and insurance companies), but eventually we got a new gutter installed. I made the contractor leave the damaged gutter. I’m sure he thought I was crazy, but I’d seen something on Pinterest that I wanted to try.
If you have read my earlier blog post about my raised beds, you know that the soil in my area is nothing but acidic sand. The first year we were here and I started a garden I amended and amended the garden patch with loads of compost with little affect. Anyhow, I’d seen on Pinterest how someone had taken gutters and used them to plant strawberries, so I wanted to give it a try.
I had to cut the seamless gutter in twain and close up the open ends before mounting it to my privacy fence. I also took a large nail and hammered holes through the bottom of the gutter every six inches or so for drainage. After I got all that finished, I put leaves in the bottom of the gutter to keep the soil from running out with the first rain. Then I filled the gutters with ‘Mater Maker compost (made here in South Carolina) and planted the bare root plants I’d gotten from parkseed.com (another SC company). I had 75 plants, so I was only able to get 50 of them in the gutters. I had to put the other 25 in other beds around my yard. So far they are looking beautiful! I’m anxious to see how well this works out. I know I’ll have to run some drip lines up there, but that’s fine. I always have to do a lot of watering here in the summer, but maybe this will minimize the amount of water I’ll need to use on my strawberries.
This past Sunday, February 1st, was International Gruit Day. My husband and I have been brewing gruits for a few months now with very interesting results. Since most folks are unaware of what a gruit is, as was I until a few months ago, let me explain.
Gruit is the word for herbs in Old German. Prior to the Protestant Reformation, beginning in the 16th century, ales were brewed with a variety of herbs and spices (singly or as a blend) to add bittering and flavor to their brew. Sometimes hops would be added to these herbal blends, called gruit or groot, but they were not used exclusively until relatively recently. In fact, in England the word beer wasn’t used until ales were brewed exclusively with hops. Prior to that all beer was called ale.
If you read my blog then you know that I’m given to writing about the past, so when I found out about gruit I was very excited. The craze for super hoppy beers the last few years had nearly turned me away from beer. Six hundred years ago the only reason you might find something on par with a double IPA would only be found if there was no other bittering agents around to brew with. Like most foods, textiles, etc., people used what was available to them, and hops weren’t always available everywhere. Scotland is still quite renown for brewing heather ales.
See what happened in Europe during the late Middle Ages was that a lot of brewing was done by monasteries (ever tried a Belgian Trappist beer?). The monks devised secret gruit blends that were lost to posterity when the monasteries were destroyed by the fire and fervor of the reformers. And during these early days ordinary people brewed in their homes and women were the primary home brewers. When they had more ale than they needed, they would sell it. Again, these early home brewers used what was available, herbs from their gardens or those that grew wild, such as yarrow, heather, bog myrtle, wild rosemary, juniper berries, or spruce tips. Laws were made which banned the use of any herbal bittering agents apart from hops. This was in part to help outlaw the beer brewed by monasteries and beer brewed by women.
When we decided to try gruit, we decided to split up the work. My hubby is the primary beer brewer (I usually do the mead, cider, ciser and wine), but I am the primary cook. To get an idea what the various gruit herbs and spices might taste like, I measured out a gram of each in its own individual glass then added an ounce of boiling water to each. I let it steep for ten minutes and then did a tasting. It was an interesting experiment! I found the lovely grassiness of heather and yarrow, the gin aroma of juniper berries, the floral bouquet of elder flowers, and the downright despicable bitterness of wormwood. I used all of the above in my first gruit blend. I, like the monks and wise women before me, am keeping my formula to myself, but I will share this bit of cautionary information – do not use more than two grams of wormwood for five gallons of ale!!! Since then we have brewed five gruit ales, with different gruit combinations for each brew.
I believe that with the current boom of micro-breweries opening and the hops shortage, we will start to see more brewing with gruits. Since I really like to keep my supply chain as short as possible, I’ve decided to devote much of my yard and garden space to growing gruit herbs this year. I have received my seeds and will be starting them soon. I’ll be growing heather, yarrow, wormwood, blue hyssop, white horehound, sweet woodruff, St. Johnswort, feverfew, and German chamomile. I am hoping that some of these plants will flourish in our acidic soil and hot summers. Perhaps I’ll even have enough to sell down the road.
One of my neighbors recently had to put her 93 year old mother in a nursing home (poor thing is in too bad of health to ever come home again) and decided to tear down the massive wheelchair ramp to her front door. I scavenged some of the wood from her and built a raised bed about 2′ high.
I had heard about lasagna gardening (aka no till gardening) and did some homework. The concept is that you lay down layers of leaves, grass clippings, food waste, etc. to compost into fabulous, nutrient rich soil. I began my layers with thick cardboard to keep all the weeds underneath from growing up in my raised bed. Then I began filling it with leaves, food waste, manure, more leaves, composted food from my compost barrel, and topped it all off with some high quality organic topsoil. I also went to a local bait shop and bought around 100 red worms and gave them a new home in the raised bed. With all that organic material, those worms should be churning out lots of worm castings to make the soil super rich.
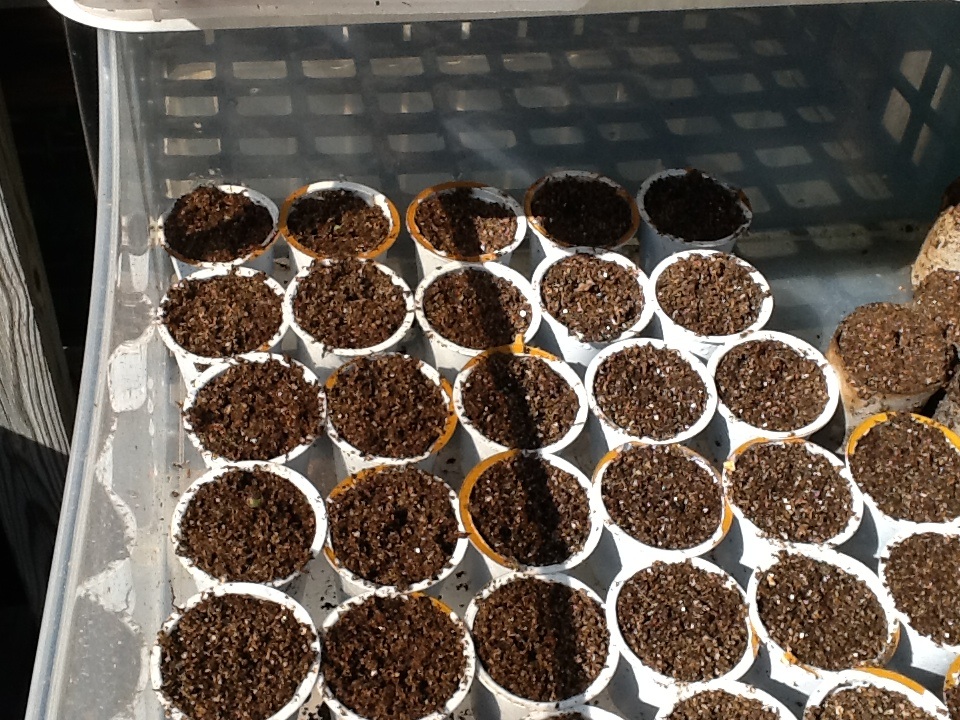
Yesterday I transplanted some of the seedlings I started a few weeks ago, like spinach, kale, collard greens, and mustard greens. I have a little gardening stool that I sat on to do my planting. It worked wonderfully! No sore back or knees!
I also figured out the best thing to start seeds in… empty cardboard toilet paper rolls. I think I saw someone suggest this on Pinterest, so I started saving my spent toilet paper and paper towel rolls. I cut the toilet paper rolls in two and the paper towel rolls into four pieces, filled them with organic seed starting mix and planted my seeds. I screwed up a bit, because I planted kale, cauliflower and cabbage at the same time, but did not keep good track of what I planted where. I was using the toilet paper rolls and K-cups in two different plastic bins. Anyway, I transplanted one set of seedlings from the toilet paper rolls (I think it was kale) into the raised bed yesterday and it was so much simpler than anything else I’ve ever used. The cardboard was damp, as it should be, and rolled off of the soil leaving the roots completely intact in the seed starting soil. I’ll be saving all my toilet paper rolls from now on! I’ll just take better care when it comes to labeling things. These are mostly K-cups, but there are a couple of toilet paper rolls on the right.